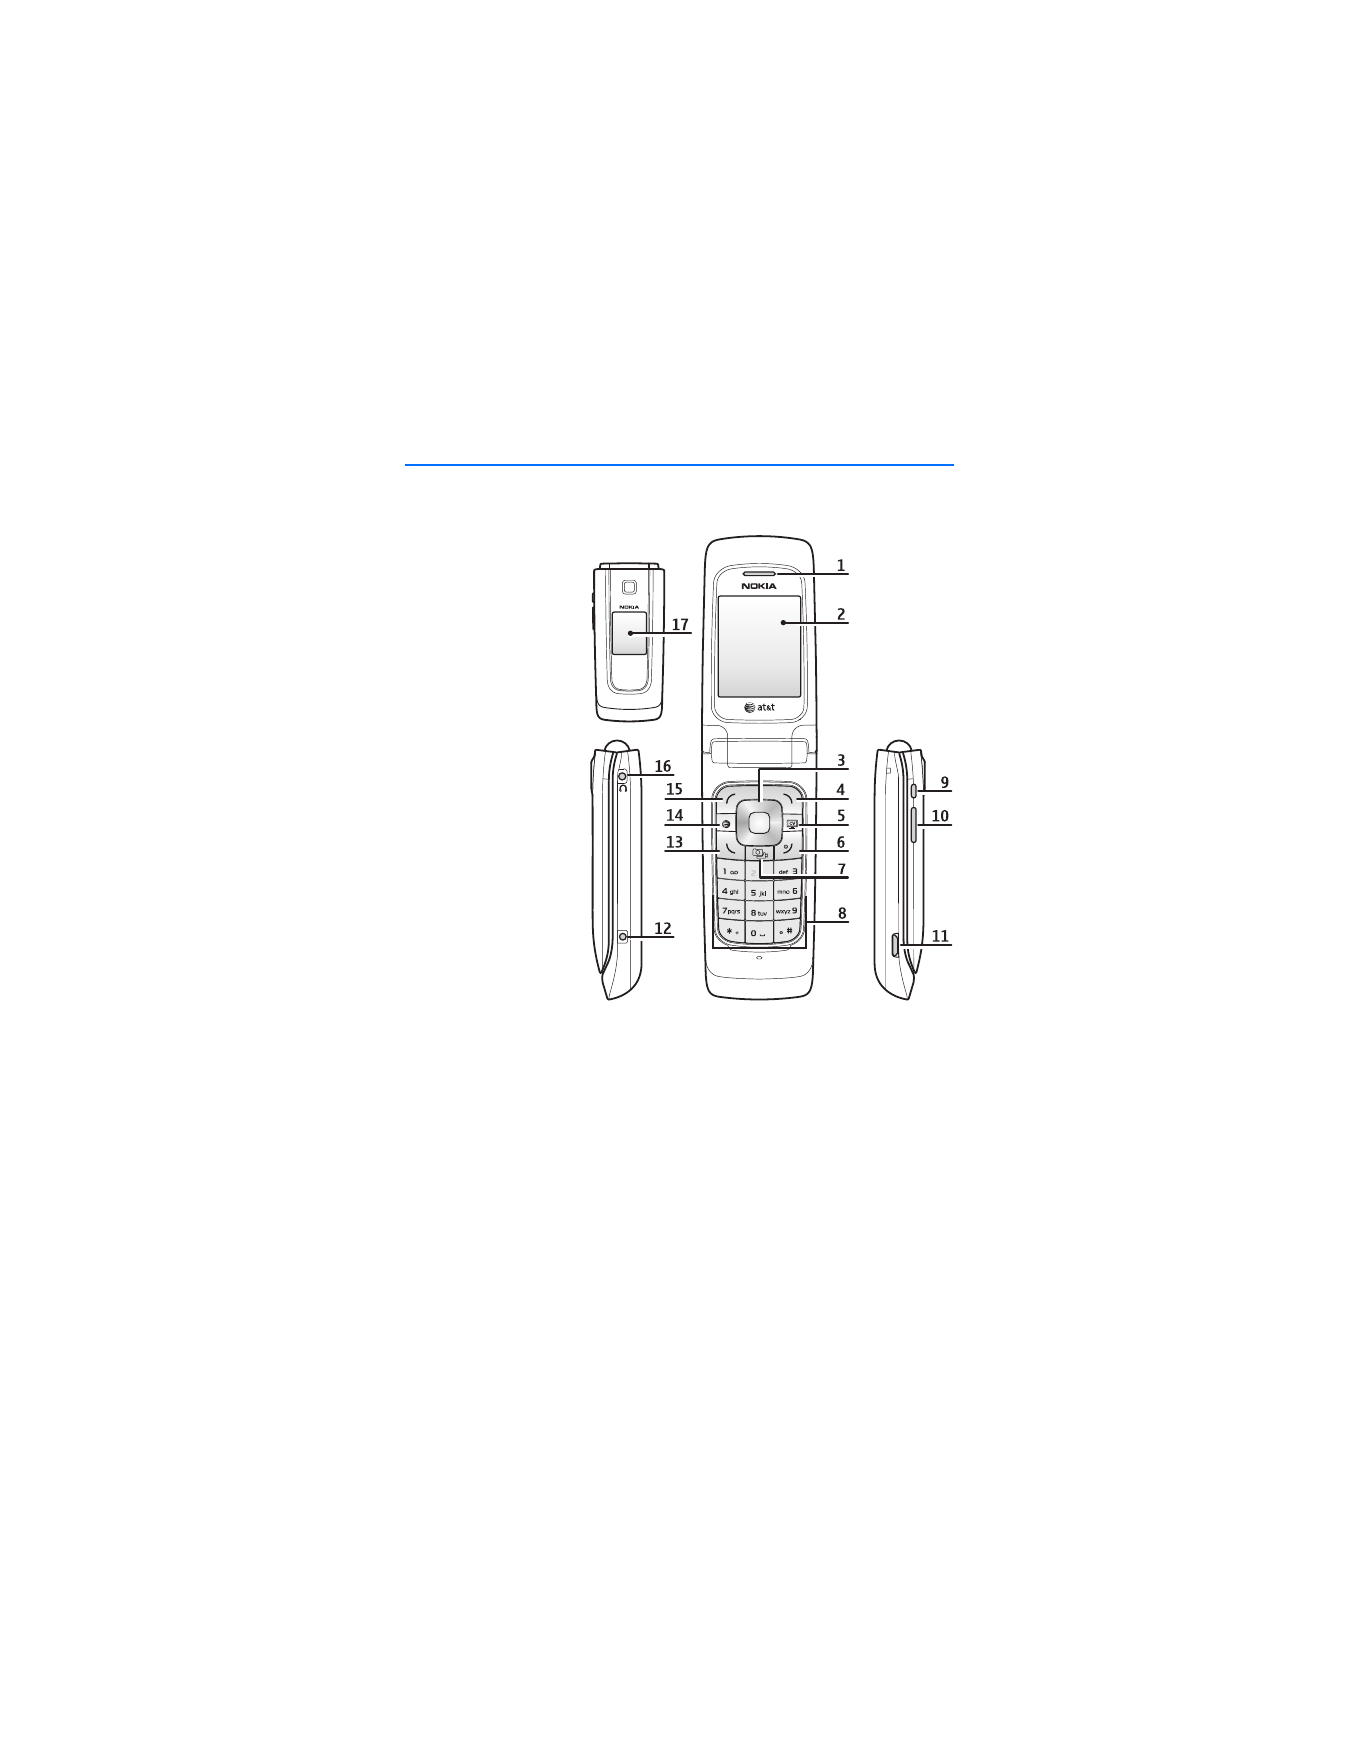
1. Get started
■ Install SmartChip card and battery
Always switch the device off and disconnect the charger before removing the battery.
Keep all SmartChip cards out of the reach of small children.
For availability and information on using SmartChip card services, contact your
SmartChip card vendor. This may be the service provider, network operator, or
other vendor.
This device is intended for use with BL-5C battery. Always use original Nokia
batteries. See "Nokia battery authentication," p. 79.
Always switch off the power and disconnect the charger and any other device before
removing the covers. Avoid touching electronic components while changing the
covers. Always store and use the device with the covers attached.
Warning: Use only batteries, chargers, and enhancements approved by
Nokia for use with this particular model. The use of any other types may
invalidate any approval or warranty, and may be dangerous.
The SmartChip card and its contacts can easily be damaged by scratches or bending,
so be careful when handling, inserting, or removing the card.
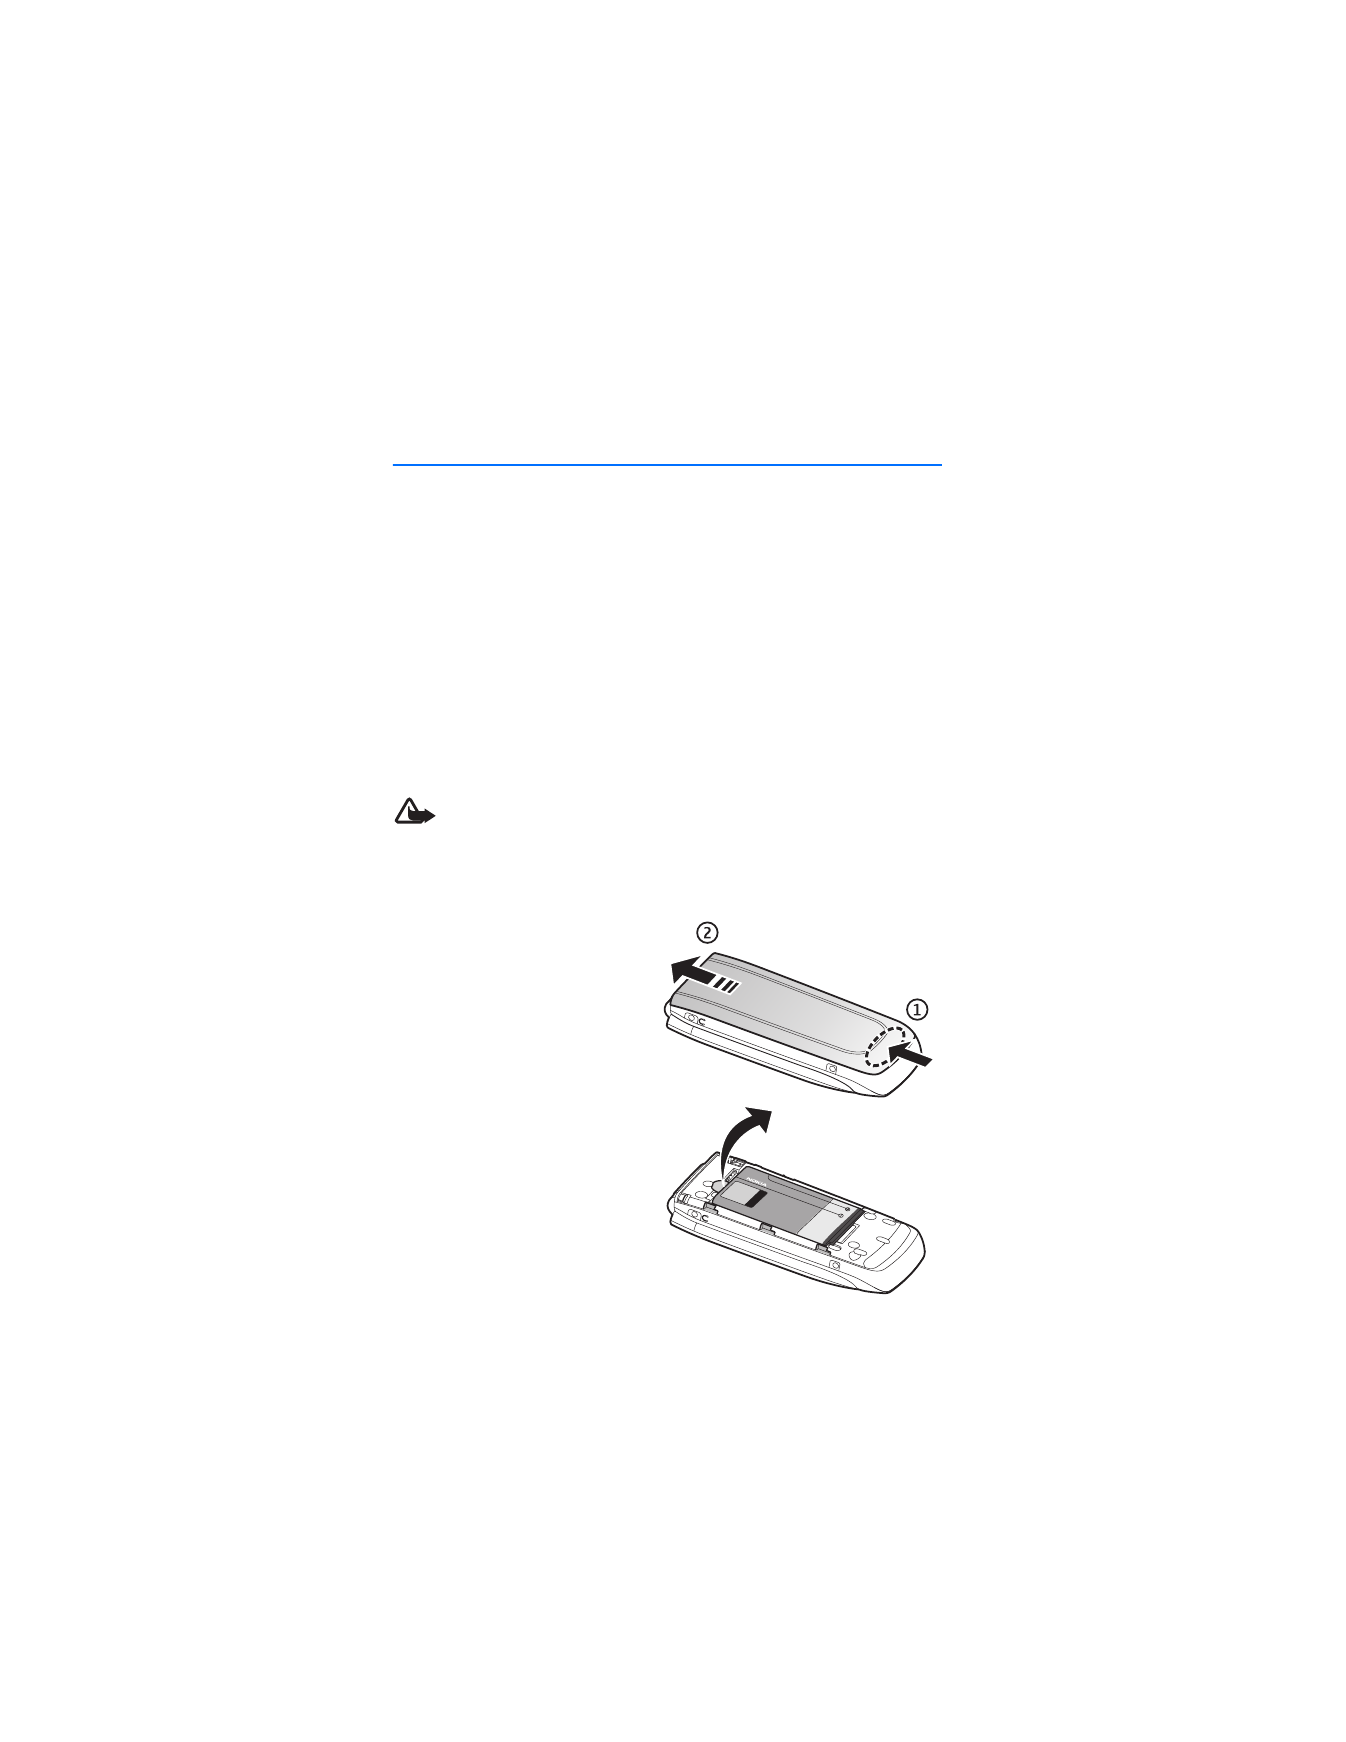
To remove the back cover of the
phone, press (1) and slide the cover
as shown (2).
Remove the battery as shown.
G e t s t a r t e d
11
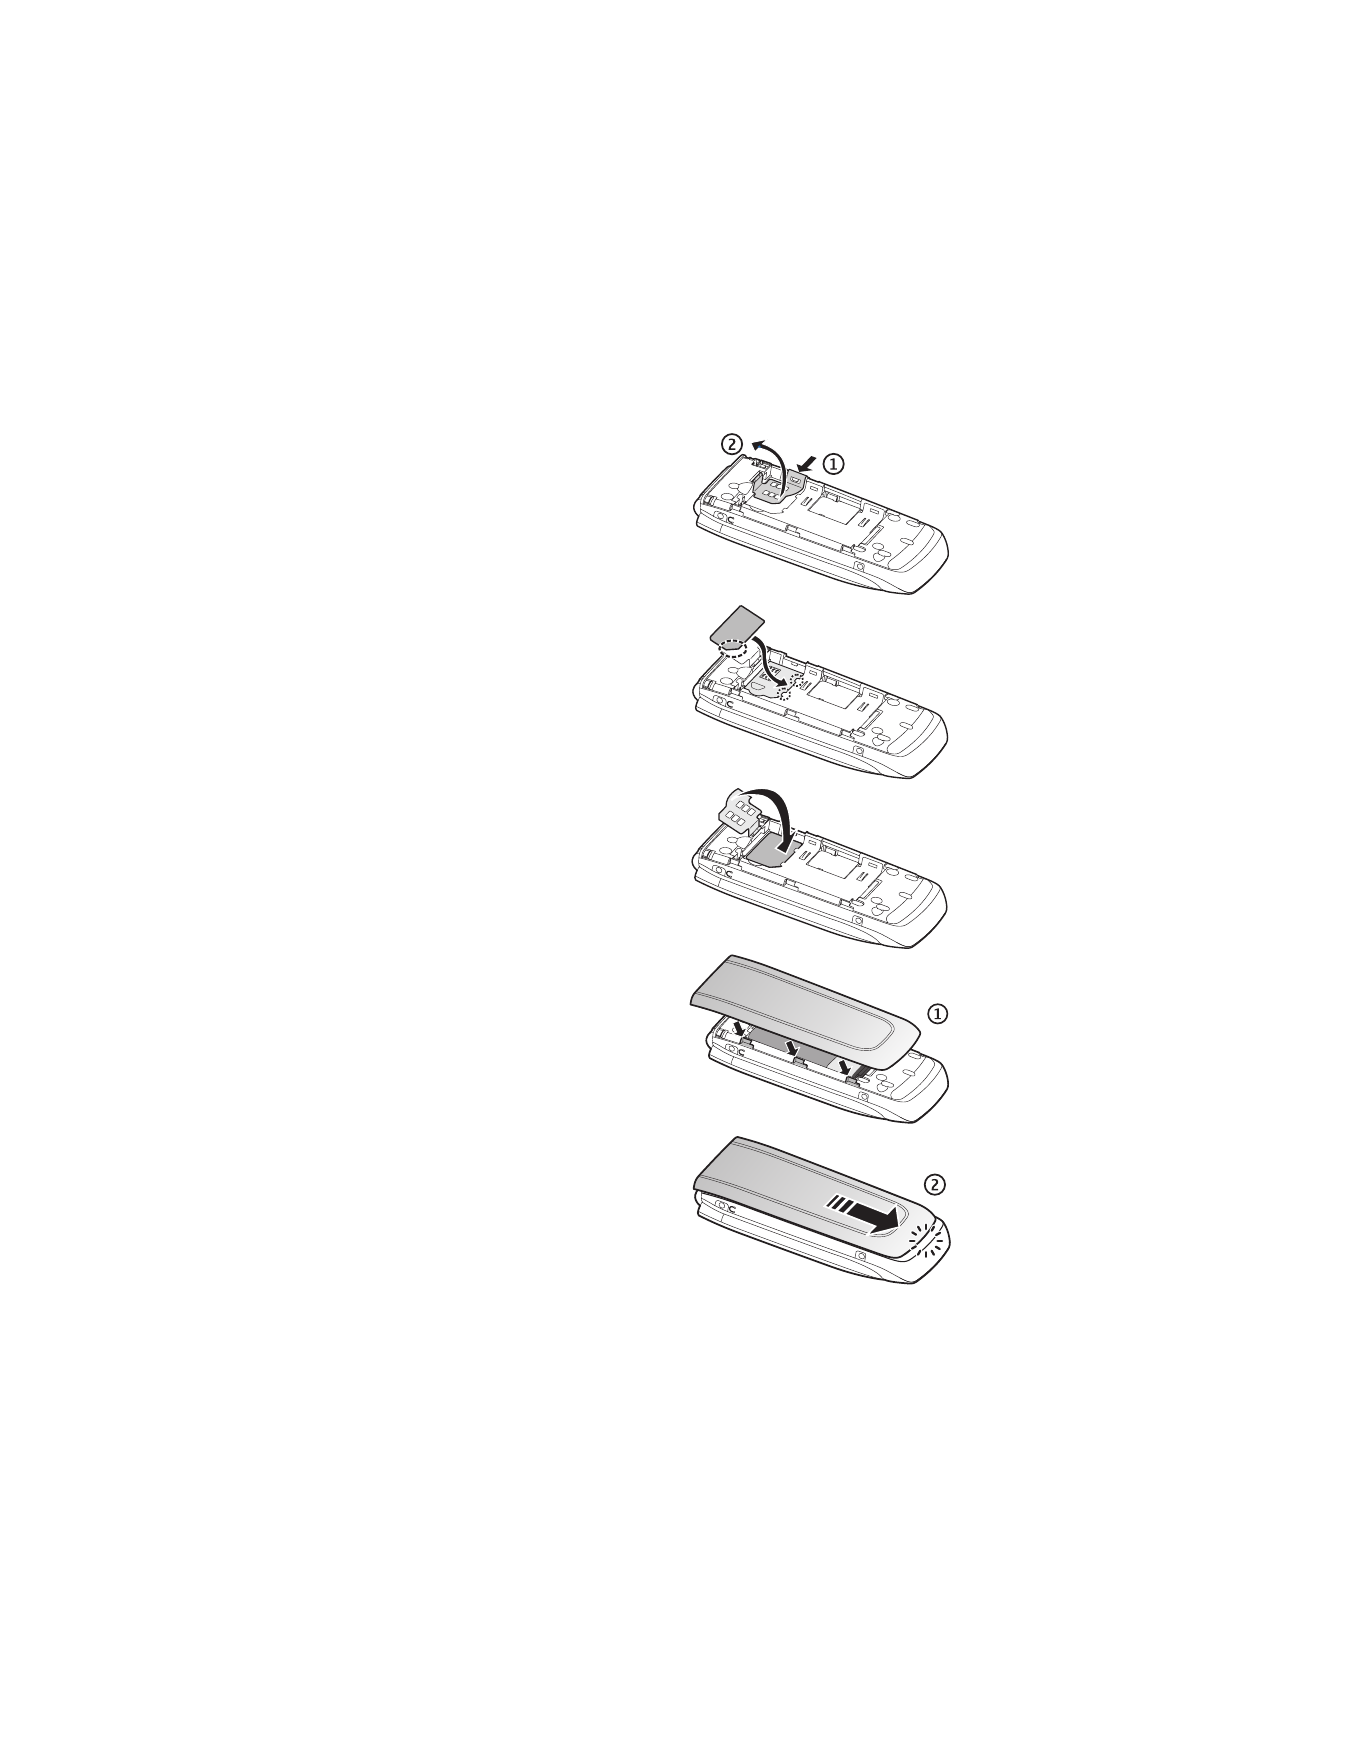
Open the SmartChip card holder (1) and
lift the holder up (2).
Insert the SmartChip card properly into
the holder.
Close the SmartChip card holder.
Replace the battery. To replace the back
cover, align the tabs on the cover to the
slots on the back of the phone (1). Push
the cover into place as shown (2).
G e t s t a r t e d
12
■ Insert a microSD card
Keep all microSD memory cards out of the reach of small children.
A microSD card can be loaded with ringing tones, themes, tones,
images and videos. If you delete, reload, or replace this card, these
functions and features may not function properly.
Use only compatible microSD cards with this device. Other memory cards, such as
reduced size MultiMedia cards, do not fit in the microSD card slot and are not
compatible with this device. Using an incompatible memory card may damage
the memory card as well as the device, and data stored on the incompatible card
may be corrupted.
Use only microSD cards approved by Nokia for use with this device. Nokia utilizes
the approved industry standards for memory cards but not all other brands may
function correctly or be fully compatible with this device.
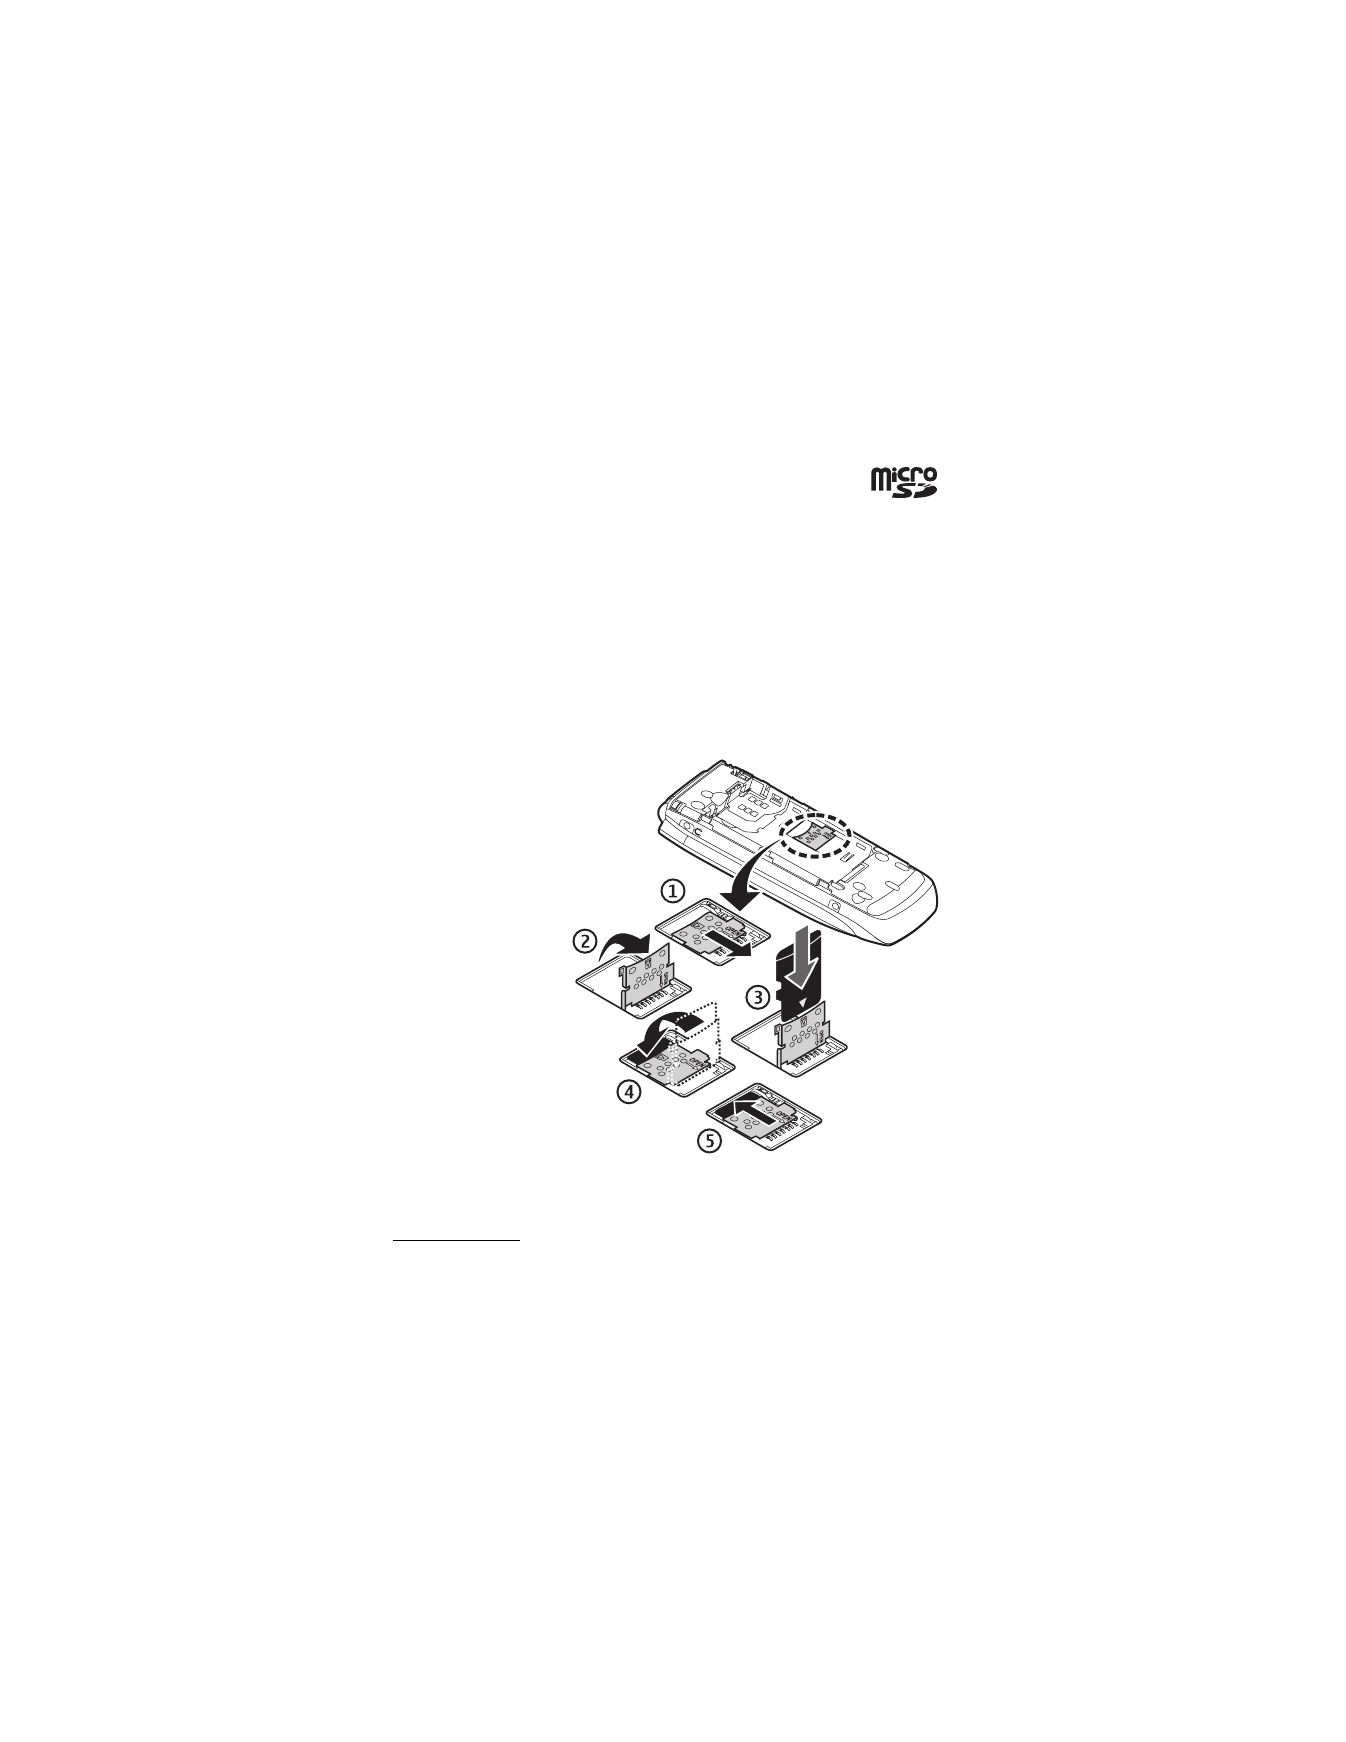
1. Remove the back
cover and the
battery. Push the
memory card holder
forward (1)and
swing card holder
up (2),
2. Insert the card into
the memory card
holder with the
gold-colored
contact area
facing down (3).
3. Close the card
holder (3 and 4)
and slide the card
holder back in
place (5).
Replace the battery
and back cover.
Memory card
Keep all memory cards out of the reach of small children.
G e t s t a r t e d
13
You can use the microSD memory card to store your multimedia files such as
video clips, music tracks, and sound files, images, and messaging data, and to
back up information from phone memory.
Some of the folders in
Tones & Graphics
with content that the phone use, for
example, Themes, may be stored on a memory card.
To insert and remove the microSD memory card see "Insert a microSD card," p. 12.
Format the memory card
When a memory card is formatted, all data on the card is permanently lost. Some
memory cards are supplied preformatted and others require formatting. Consult your
retailer to find out if you must format the memory card before you can use it.
To format a memory card, select
Menu
>
My Stuff
>
Tones & Graphics
or
Games
& apps
the memory card folder
,
Options
>
Format memory card
>
Yes
.
When formatting is complete, enter a name for the memory card. An unformatted
memory card may have NO NAME listed instead of Memory card.
Lock the memory card
To set a password to lock your memory card to help prevent unauthorized use, select
Menu
>
My Stuff
>
Tones & Graphics
> the memory card folder
>
Options
>
Set password
. The password can be up to eight characters long.
The password is stored in your phone, and you do not have to enter it again while
you are using the memory card on the same phone. If you want to use the memory
card on another phone, you are asked for the password. To delete the password,
select
Options
>
Delete password
.
Check memory consumption
To check the memory consumption of different data groups and the available
memory for installing new applications or software on your memory card,
select
Options
>
Details
.
■ Charge the battery
Check the model number of any charger before use with this device. This device is
intended for use when supplied with power from an AC-3U or AC-4U charger.
Warning: Use only batteries, chargers, and enhancements approved by
Nokia for use with this particular model. The use of any other types may
invalidate any approval or warranty, and may be dangerous.
For availability of approved enhancements, please check with your dealer. When
you disconnect the power cord of any enhancement, grasp and pull the plug, not
the cord.
G e t s t a r t e d
14
1. Connect the charger to a
wall socket.
2. Connect the charger to
your phone.
A CA-44 charging adapter can be
used with older charger models.
If the battery is completely
discharged, it may take a few
minutes before the charging
indicator appears on the display or before any calls can be made.
The charging time depends on the charger used. Charging a BL-5C battery with
the AC-4U charger takes approximately 2 hours and 20 minutes while the phone
is in the standby mode.
■ Open and close the phone
Open and close the phone manually. When you open the fold of the phone, it opens
up to approximately 165 degrees. Do not try to force the fold open more.
Depending on the selected theme, a tone sounds when the fold is opened or closed.
■ Switch the phone on and off
Warning: Do not switch the phone on when wireless phone use is
prohibited or when it may cause interference or danger.
To switch the phone on or off, press and hold the power key. See "Keys and parts,"
p. 17.
If the phone asks for a PIN or a UPIN code, enter the code (displayed as ****), and
select
OK
.
Set the time, time zone, and date
Enter the local time, select the time zone of your location in terms of the time
difference with respect to Greenwich Mean Time (GMT), and enter the date.
See "Set time and date," p. 68.
G e t s t a r t e d
15
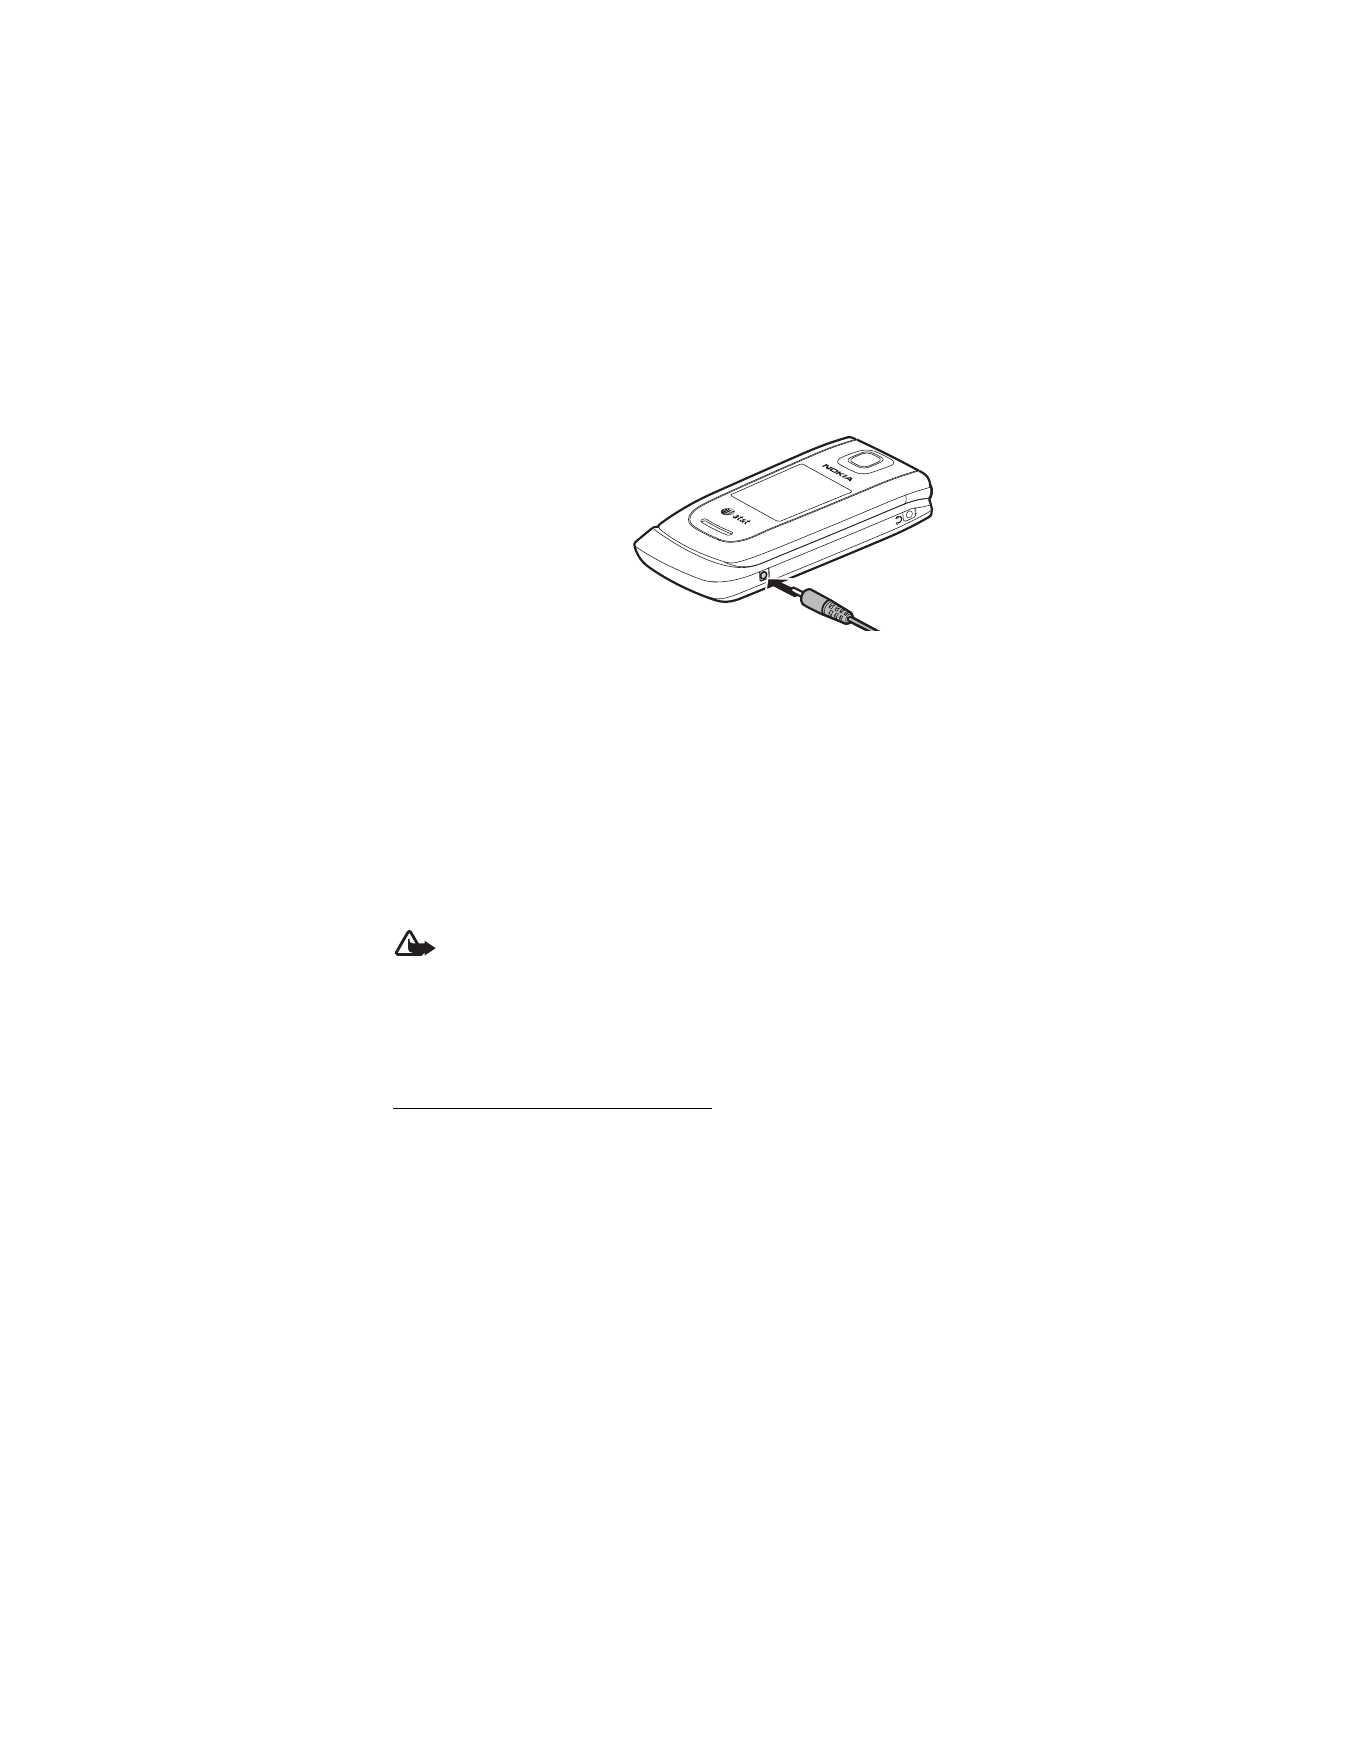
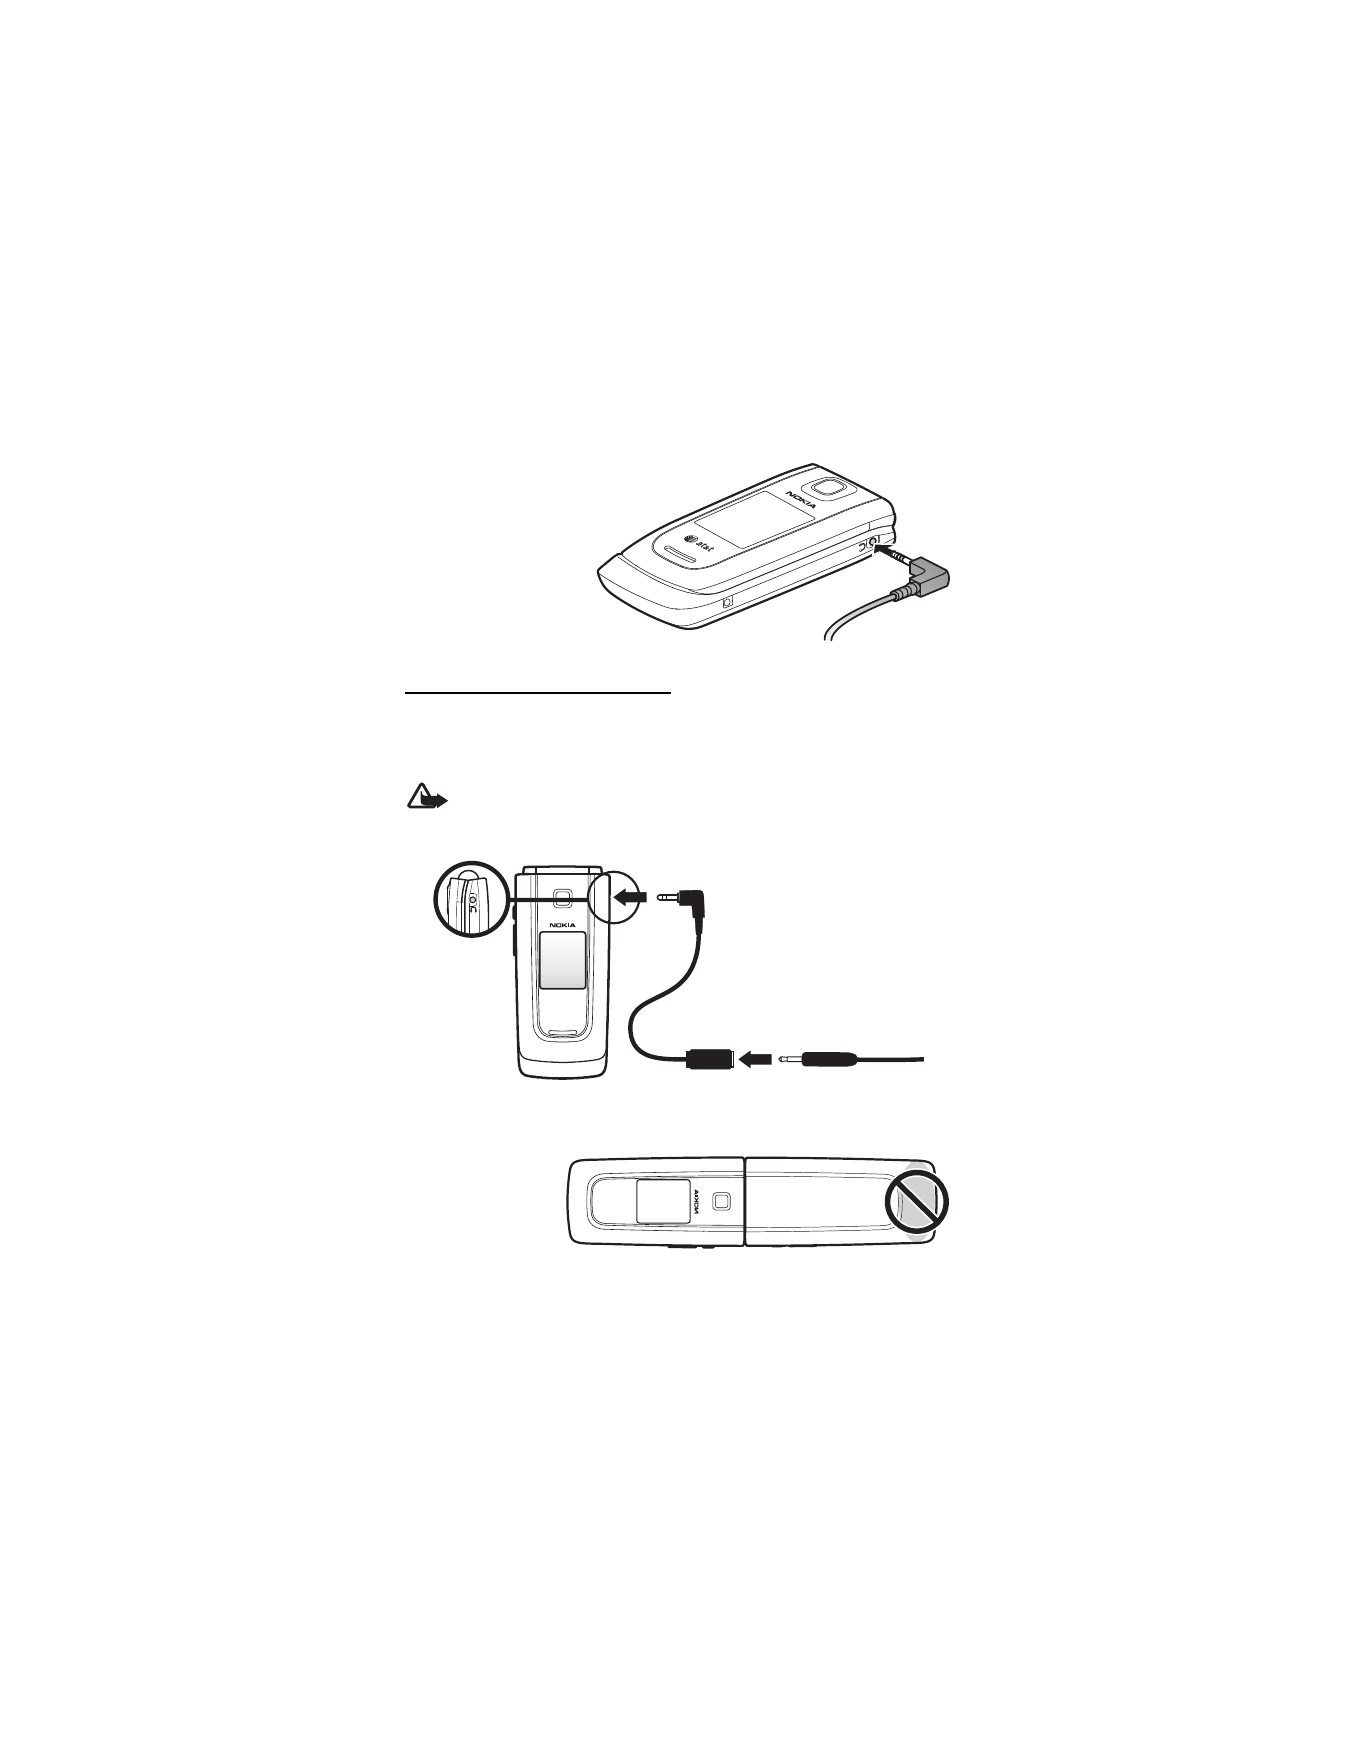
■ Connect a headset
You can connect a
universal 2.5 mm
headset to your device.
Connect the headset to
the device as shown.
Connect stereo headphones
You can use 3.5 mm stereo headphones with your phone to listen to music.
Connect the AD-61 headset adaptor to your headphones first. Then connect the
AD-61 adaptor to your phone.
Warning: When you use the headset, your ability to hear outside sounds
may be affected. Do not use the headset where it can endanger your safety.
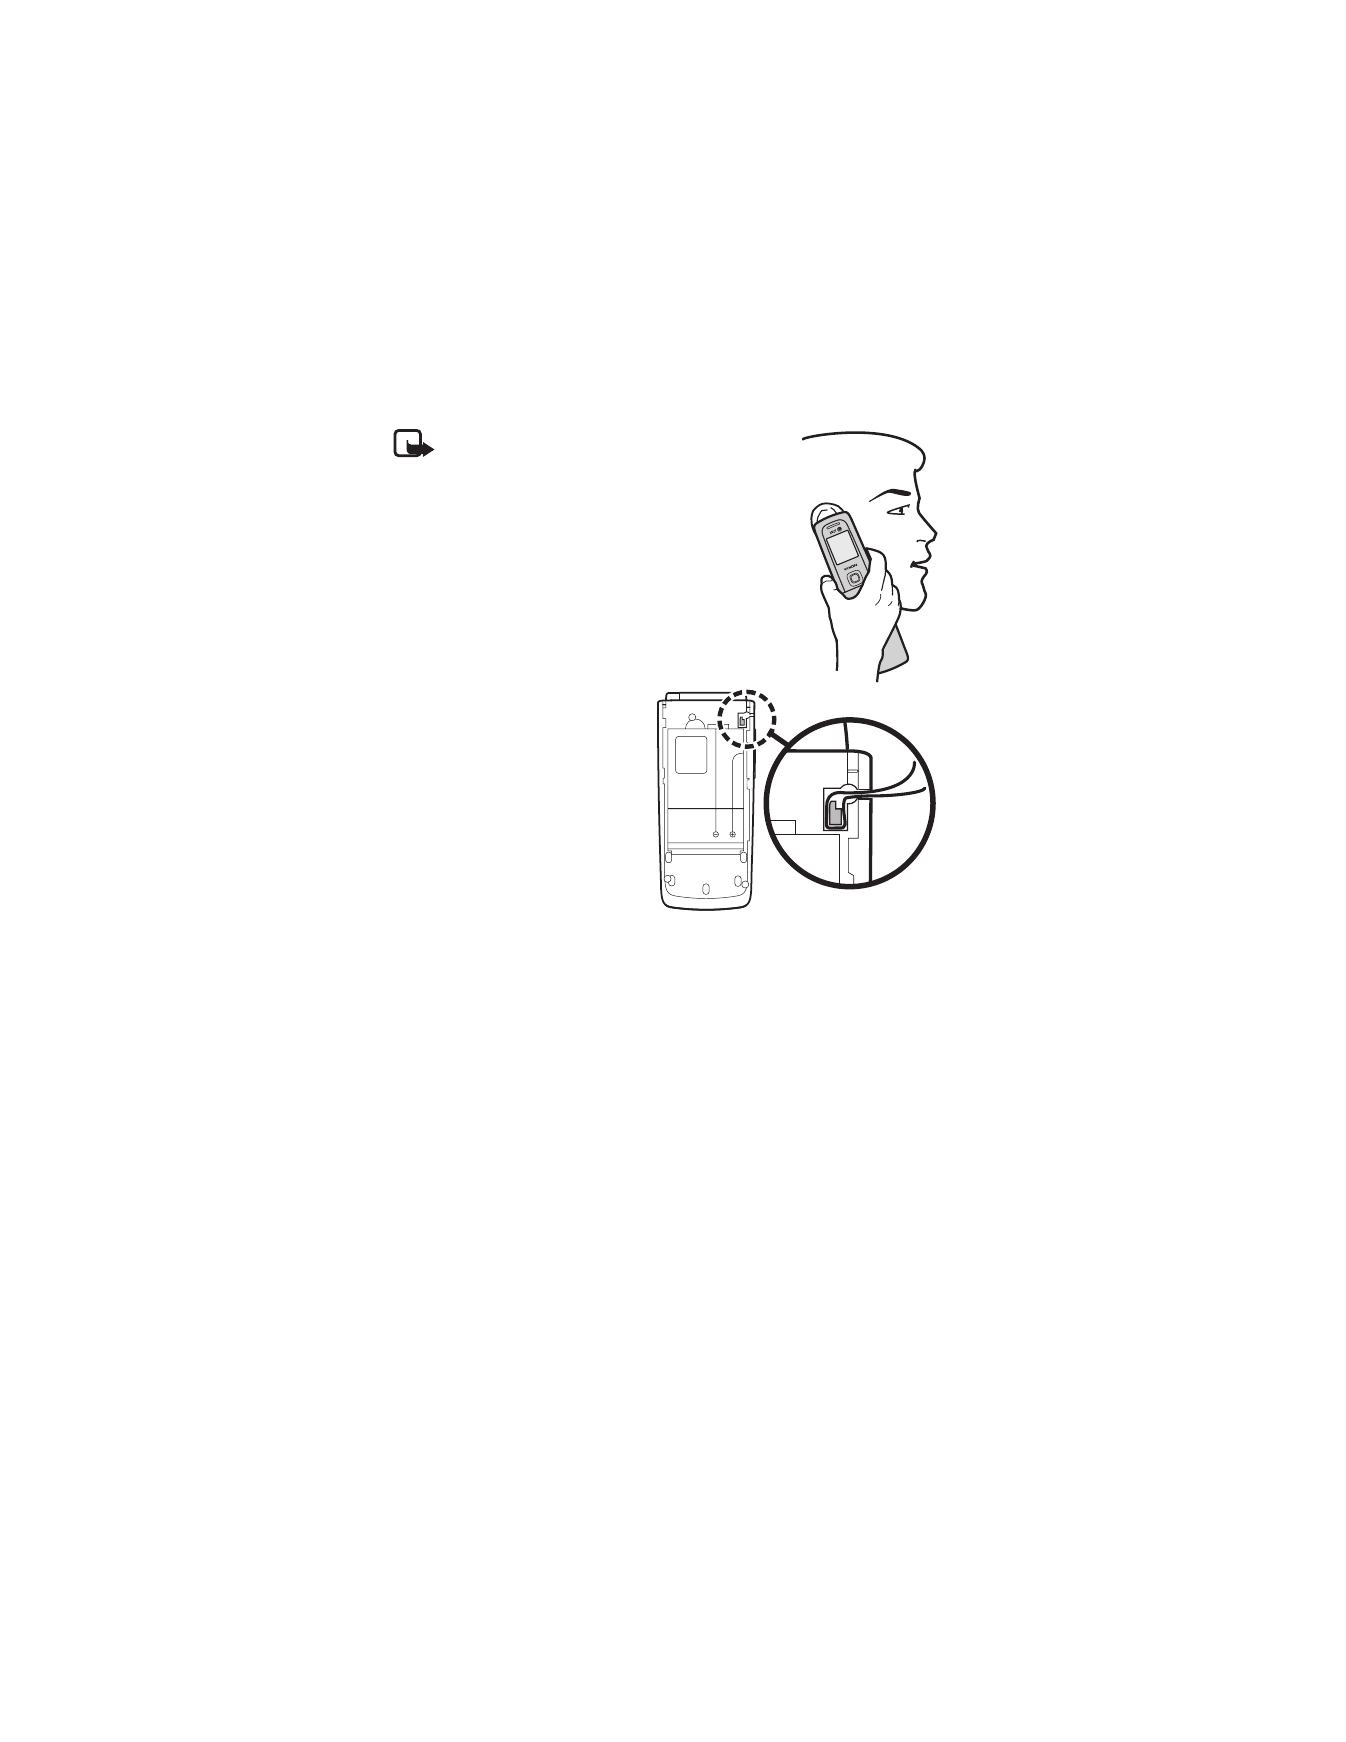
■ Antenna
Your device has an
internal antenna
located at the
bottom of the phone.
* AD-61 Sold Separately
G e t s t a r t e d
16
Note: As with any other radio transmitting
device, do not touch the antenna unnecessarily
when the device is switched on. Contact with
the antenna affects call quality and may cause
the device to operate at a higher power level
than otherwise needed. Avoiding contact with
the antenna area when operating the device
optimizes the antenna performance and the
battery life.
■ Phone strap
Remove the back cover of the
phone. Insert a thread through
the eyelet. Place the thread
around the post of the phone
as shown in the picture.
Tighten the thread. Put the
back cover back in place.
■ Digital rights management
Content owners may use different types of digital rights management (DRM)
technologies to protect their intellectual property, including copyrights. This device
uses various types of DRM software to access DRM-protected content. With this
device you may be able to access content protected with WMDRM 10. If certain
DRM software fails to protect the content, content owners may ask that such DRM
software’s ability to access the new DRM-protected content be revoked.
Revocation may also prevent renewal of such DRM-protected content already in
your device. Revocation of such DRM software does not affect the use of content
protected with other types of DRM or the use of non-DRM-protected content.
Digital rights management (DRM) protected content comes with an associated
activation key that defines your rights to use the content. If your device has
WMDRM protected content, both the activation keys and the content will be lost
if the device memory is formatted. You may also lose the activation keys and the
content in case the files on your device get corrupted. Losing the activation keys
or the content may limit your ability to use the same content on your device again.
For more information, contact your service provider.
Y o u r p h o n e
17